Wednesday, 13 June 2012

Spicy aubergine with tomatoes

I got the inspiration for this dish from the BBC Good food website. It's again a simple dish to prepare, as I'm pretty busy at work lately, I always go for dishes with minimal effort, but maximum flavour.

This dish is not 'chilli hot'. I used a pinch of crushed chilli flakes to give a bit of heat, but it wasn't too much to overpower the flavours of the other spices.

Spicy aubergine, with bread
I used plum tomatoes in this dish which I much prefer than normal cherry tomatoes. They are a lot sweeter and more flavourful. The aubergine was juicy in this dish, and I used the bread to mop up the sauces. I had some leftovers the next day for lunch; it tasted even better!

Simmering in the pot
Ingredients
(serves 2 as a side dish)

1 aubergine, sliced into about 1/2 cm slices and lengthwise
150 grammes of plum tomatoes, sliced into halves
3 cloves of garlic, sliced thinly
a handful of parsley
1 tablespoon of vegetable oil
1 teaspoon of cayenne pepper
1/2 teaspoon of ground cumin (and an extra pinch)
1 teaspoon of turmeric ( and an extra pinch)
1 teaspoon of whole coriander
1 teaspoon of mustard seeds
1 teaspoon of chili flakes
salt to taste

Method

  • Brush the aubergine with oil, and season with salt, a pinch of cumin and a pinch of turmeric. Grill for about 20 minutes until tender. Set aside.
  • Heat the oil in a small saucepan to medium high, and add the mustard and coriander seeds. Let the seeds heat slowly in the pan to infuse the oil with its flavours.
  • Add the garlic pieces and when it starts to brown, add the tomatoes. 
  • Add the grilled aubergine and the remainder of the spices and the chilli flakes.
  • Stir well and cook for 2-3 minutes, until the tomatoes soften. If it gets to dry, add about 2-3 tablespoons of water.
  • Add the parsley, season and serve.

Saturday, 9 June 2012

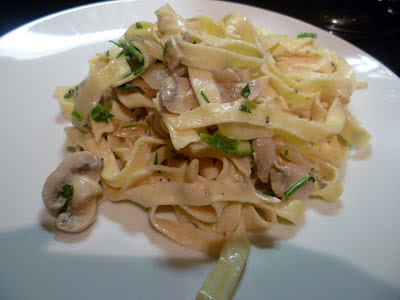
Creamy tagliatelle with mushrooms

This was the first time I used fresh pasta! I'd say in terms of flavour, I did not taste much of a difference. It does cook much quicker though, only about 2 minutes in boiling water. I haven't had tagliatelle for some time now although it ranks pretty high on the list of my favourite pasta. 

Creamy tagliatelle
I had this for dinner some time ago, I was craving for a creamy dish, and wanted something simple and quick after work. This did the trick.

Cooking the mushrooms and asparagus. Note the pasta on the left ready to go :)
 
With the chopped parsley
Ingredients
(Serves 2 as a main)

200 grammes of fresh tagliatelle
75 grammes of button mushrooms, sliced
75 grammes of asparagus, sliced at an angle
1 brown onion, chopped
a splash of single cream
3 cloves of garlic, finely chopped
1 tablespoon of vegetable oil
salt and pepper to taste
a handful of parsley, roughly chopped

Method

  • Heat the oil in a deep saucepan. Add the onions and sweat until soft.
  • Add the garlic and the mushrooms. Cook for about 2-3 minutes until almost done. 
  • Add the asparagus and cook for another 2 minutes or until tender. At the same time, cook the tagliatelle in a pot of boiling water according to the instructions on the packet.
  • Remove the saucepan from the heat and let it cool slightly. Drain the pasta, and add it to the saucepan with the asparagus and mushrooms.
  • Add the cream, and season to taste. Stir in the chopped parsley and serve. I added only a little cream as I didn't want the sauce to be too heavy. If you prefer a thicker sauce, add more cream.

Thursday, 7 June 2012

Malaysian Food: Bugis Street Birmingham

I had dinner at Bugis Street a few weeks ago. The restaurant is part of Copthorne Hotel, however, non guests of the hotel are also welcome. Although it advertises itself as Singaporean food, the chef is actually Malaysian and so are a few of the members of the staff. Quite a lot of the food served here is also distinctly Malaysian. However as I have not been to Singapore myself, it is possible that similar dishes are available in Singapore. I've been here a few times before and I wish I found out about it earlier! I've only had good experience here so far, so it seems fit that I should blog about it.

I ordered a Fried Hokkien Mee. This is actually a Southern Malaysian dish, if you order a Hokkien Mee when you're in the Northern States where I'm from, you'll get noodles in a prawn-flavoured broth instead.

This was really good! Fried Hokkien mee is essentially yellow egg noodles stir fried with an assortment of fresh ingredients in a sauce made of dark soya sauce. Bugis Street's version had some seafood (prawns and squid) and some thin slices of pork. The 'wok hei' was strong, lending a very good smoky flavour to the dish. It also had some small crunchy pieces of fried pork lard- warning, this is very unhealthy, but really delicious in this dish.

Fried Hokkien Mee
My dining companion Z ordered the Seafood Laksa. Again, if you order Laksa in different states in Malaysia, you will find that each state has their own version of laksa. Laksa is typically noodles (sometimes yellow egg noodles, rice vermicelli or rice noodles) in a broth. Where I'm from, the Laksa is rice noodles served in a piquant fish based stock and sliced bird eyes chillies.

Bugis Street's version is more like Kari Laksa (translated to Laksa in curry); yellow egg noodles served in a bowl of curry topped with seafood and a hard boiled egg cut into half. This dish again didn't disappoint. The curry was absolutely drinkable, it wasn't too spicy, it was creamy and had a slight tang to it.

Seafood Laksa
Overall dinner was absolutely delicious! The portions were good-sized, and the price of both the dishes were in the region of 7-8 pounds. Good value, and I have to say, pretty authentic. I would say go for the dishes under the 'Singaporean/Malaysian Specialities' section, as these tend to be pretty authentic. 

Bugis Street
The Copthorne Hotel 
Paradise CircusBirmingham B3 3HJEngland

Disclaimer: This entry was not a sponsored post, and is entirely based on my personal tastebuds. I have not received any monetary or non-monetary payment to write this post. 


Monday, 14 May 2012

Spinach, ricotta and chorizo filo pie

Remember an earlier post, when I said I was excited to have my dinner? I was waiting for this to cook in the oven! :) I love the combination of spinach and ricotta, I feel like it's a match made in food heaven :) The addition of chorizo made this into a non vegetarian dish, but feel free to omit it, and add a teaspoon of paprika instead (to bring smokiness) to the dish.

Fresh out of the oven! Crunchy bits at the top :)
Pastry obviously makes most things better :) But I tasted the filling before covering it with the filo and it was yummy! I could have eaten the filling just like that :)

I believe this is sort of a mediterranean inspired dish, and I've seen a few similar around. I've seen recipes which add pine nuts and raisins. I might try that in the future.

The pie was enough to last me quite a few meals. I even had it for breakfast the 3rd day. Make sure you keep it in the fridge though, especially during the summer.

Look at those flaky layers! This was the first slice, of quite a few :)
So here's the recipe for this! Hope you'll enjoy it as much as I did :)

Spinach, ricotta and chorizo filo pie
(Serve 4-5 as a main)

Ingredients

300 grammes of frozen spinach
1 large red onion, sliced
100 grammes of chorizo, roughly chopped
250 grammes of ricotta
200 grammes of filo pastry, at room temperature
1 teaspoon of cumin
1/2 teaspoon of nutmeg
1 teaspoon of cayenne pepper
juice of 1 lemon
salt and pepper to taste
1 tablespoon of vegetable/olive oil
10 grammes of butter

Method

  1. Heat the oven to 185C (fan assisted)
  2. First we prepare the filling. Heat the oil in a pan, and add the red onion. Cook for 3-4 minutes, or until softened.
  3. Add the chopped chorizo, and cook on medium heat. The oil from the chorizo will slowly release as the chorizo cooks, and this will add flavour to the spinach.
  4. Add the spinach and cook for another 1-2 minutes.
  5. Add the cumin, nutmeg, cayenne pepper, lemon juice and salt and pepper to taste. Stir well. 
  6. Remove for heat and let it cool down for about 5-10 minutes. Afterwards add the ricotta. You might want to taste again at this stage to check on the seasoning.
  7. Melt the butter. Brush the pie tin with some melted butter. 
  8. Put 2 layers of the filo pastry on the pie tin. My pie tin's diameter is about 25 cm.
  9. Spoon the filling into the pie tin. Cover with the remaining filo sheets.I made some the sheets scrunched up a bit for a bit of artistic edge
  10. Brush the top with the remaining melted butter
  11. Bake in the per heated oven for 30-45 minutes, until golden brown.

And here's another picture, as I enjoyed this so much :)


Friday, 11 May 2012

Fried prawns with an Asian chilli dip

I had a craving for deep fried food the other day. I had a late lunch, so I only got hungry at about 8, 9pm. So I wasn't really in the mood to go out and buy some fried chicken at the local kebab shop. So I fried some prawns instead :)

Deep fried prawns
I had some seasoned flour from home that I used for this dish. However, you can produce the same results by using cold water, self raising flour and salt and pepper to taste. Cold water (some use sparkling water) produces a crunchy batter. If you use sparkling water, the batter is even lighter. The recipe below is based on what I actually did.

To make the dip, I didn't really have a specific recipe, I just put in the sauce as I went along :) That really is the way I often cook.

The prawns with the dip
Fried prawns with an Asian chilli dip
(Serves 1-2 as a min)

Ingredients

250 grammes of raw prawns
Seasoned flour ( I added some chilli flakes for an extra kick)
1 egg white

For the dip
2 tablespoons of nam pla (fish sauce)
1 red chilli, finely chopped
1 tablespoon of red wine vinegar
1 tablespoon of honey
2 tablespoons of soya sauce to taste

Method

  • Dip the prawns in the egg white, and then coat with the seasoned flour. Deep fry in hot oil until cooked. Set aside
  • Reuse 1 tablespoon from the oil that was used to cook the prawns. Heat the oil in a pan, and add the chopped chilli.
  • Mix the other ingredients in a bowl until well combined, and pour into the pan. 
  • Heat the sauce for 2-3 minutes, till slightly reduced.
  • Serve with the prawns
Always try your sauce, and season accordingly. Bear in mind that the fish sauce can be quite salty, so you would want to go easy on the soya sauce. 

I didn't use coriander as I didn't have any, but serving the dip with some finely chopped coriander would bring the dip to the next level. The next time I cook this, I'd definitely add the coriander :)

When I was eating this, I had a big grin on my face. The crunch of the prawns really hit the spot. Yummss :D I was a happy girl indeed!

Thursday, 10 May 2012

Easy creamy pasta with tzatziki

I had this for dinner earlier this week. It's really a quick and easy dish, perfect for mid week dinner after a busy day at work.

I actually got the inspiration for this dish from the BBC Good Food website. I've used tzatziki as a pasta sauce before, yes it's a cheat as I use shop bought tzatziki, but doesn't mean it's any less delicious :) Tzarziki is a Greek yogurt sauce, with finely chopped cucumbers. It gives this dish a lovely tang and slight crunch from the cucumbers.

Rigatoni with tzatziki
Easy creamy pasta with tzatziki
(Serves 1 as a medium-large main)

Ingredients

75 grammes of rigatoni
1 tub of tzatziki (about 200 grammes)
1 large handful of frozen peas, cooked in boiling water for 1-2 minutes
About 50 grammes of cooking chorizo, sliced into 1/2 cm pieces
1 tablespoon of oil (I used vegetable oil, but olive oil would work fine too)

Method

  1. Cook the rigatoni according to the instructions on the packet. Mine took about 10 minutes to cook.
  2. While the pasta is cooking, we make the sauce. Heat the oil in a pan, and add the chorizo. Cook on medium heat. The chorizo will cook slowly, while releasing its oils. The oils gave a smoky flavour to this dish.
  3. Then add the peas. Leave the heat on for about 1-2 minutes. 
  4. Turn off the heat and add the cooked rigatoni. Reserve some of the cooking water.
  5. Pour the tzatziki into the pan, and add a little of the pasta cooking water if the sauce looks too thick for your liking.
  6. Serve!

Wednesday, 9 May 2012

Okra with caramelized red onions

I'm waiting for my dinner to cook in the oven right now, it's something that I've been looking forward to make, and I'm excited to eat it! :) But for now, let's have a post about a very simple dish that I made over the weekend.

My mom cooked this dish pretty often and I absolutely love her version. I jazzed my version up a bit, to introduce a little sweetness to the dish. Caramelized red onions are delicious, I love the soft, sweet onions in close to every dish!

Okra with caramelized red onion

Okra with red onions
(Serves 2 as a side dish)

Ingredients

175 grammes of okra (I get them in a pouch from Tesco)
1 large red onion, sliced thinly
1 medium sized green chilli, finely chopped
2 cloves of garlic, finely chopped
2 tablespoons of light soy sauce
1-2 tablespoons of vegetable oil

Method

  1. Trim the edges and the top of the okra. Boil it whole for about 4-5 minutes, or until tender to touch. Set aside
  2. Heat the oil in a pan. Add the onions and chilli, and cook on medium heat for about 3-4 minutes. 
  3. Once the onion slices turn slightly brown, add the garlic. We don't want to add it too early else it'll burn.
  4. Once the onions are cooked, add the soya sauce and season to taste.
  5. Serve on top of the boiled okra, and have it with steamed white rice.

Thursday, 3 May 2012

Busy!

Note to self: Always draft lots of posts so that when you have exams, the blog will continue to be updated!

Yes, I have been very poor at updating myrumblingtummy. Not that I haven't been eating, more like the things that I have been eating aren't really exciting. I wouldn't expect anyone to want to see pictures of bowls of instant noodles (jazzed up with an egg) very often.

So yes, I am still alive and well, and I shall update the blog asap! :) This weekend looks promising :)

Thank you for your patience and I will be back soon :)

Much love
mammam

Sunday, 25 March 2012

Thai Food: @Siam

On Sunday, I met up with a dear friend of mine, Y for a long awaited dinner. It's been SO long since we last met up, with our busy schedules, it was hard to find time that would fit both of us. She suggested @Siam, located in Soho, London.

Before dinner, I googled it, and visited their website; wow, it looked posh! It didn't look like something I was used to; I also tend to avoid posh looking restaurants when I'm looking for Oriental/South East Asian food. My experience so far has indicated that if you're looking for good quality food of oriental/south east asian food, fine dining isn't the way to go.

However with @Siam, I was wrong. When I stepped into the restaurant, the place looked more like a cosy family restaurant, rather than a fancy posh place. There were a few patrons there already at 6, but the place was mostly empty. We were seated at a small corner of the restaurant. Y was seated in front of a silver sparkling statue of Buddha. I was facing it! So I was being watched when I was tucking in :)

Prawn spring rolls
We both ordered a starter and a main each. Y got a voucher off the Time Out website, that gave us a 50% discount off our meal. Always a plus for me :) For starters, Y ordered prawn spring rolls. The prawns were wrapped in rice paper, and deep fried till golden. I thought this was really good! It was served in a crispy edible shell (which reminded me of papadom), and sweet chilli sauce. The shell was rather bland, and a bit greasy. However I don't think it was meant to be eaten, more like a decorative piece on the plate. I'm certain that the sweet chilli sauce was shop bought, however, I love sweet chilli sauce, so no complaints there from me.

Thai fishcakes-sorry for the slightly blurry pic!
I ordered Thai fishcakes for my starter. When it came (also with sweet chilli sauce by the side), I was a little surprised that it looked a lot like slices of fishballs you can get from a chinese supermarket. I'm not sure it was made in the restaurant, but it was yummy indeed. They had a hint of lemongrass too.

Y's pad thai
For main, Y order a chicken pad thai, while I ordered tofu green curry. I'm a huge fan of tofu :) Y's pad thai was DELICIOUS! It had a slight sweetness to it. Yums. It also came with pieces of tofu and crushed peanuts by the side. Y was a tad disappointed there weren't slices omelette at the top. I don't eat Thai food very often, so I wasn't aware whether that is a common (possibly essential?) addition.

Tofu green curry
My tofu curry was rich and very good. It had some pieces of bell pepper, green beans and chunks of baby aubergine. Quite substantial. I had my curry with steamed jasmine rice. The curry was very drinkable; it wasn't too spicy, and I thought that the balance of flavours were very good. The curry came warm; I was expecting it to come a little hotter. The curry didn't come with the rice, so I had to order it separately.

Overall, it was an enjoyable dinner! Service was efficient, and the dishes came relatively quick. Portions were good sized, not massive, but more than enough to fill you up. The starters were about 6 pounds each before discount, the mains, about 10 pounds. The entire came to about 20 pounds, after the discount, and I thought it was very worth it :) The food was great, and the company-even better! :)

@ Siam
48 Frith Street London W1D 4SF
T. 020 7494 4511


Disclaimer: This entry was not a sponsored post, and is entirely based on my personal tastebuds.  I have not received any monetary or non-monetary payment to write this post. 

Wednesday, 21 March 2012

Asian style steamed cod

I had this for dinner a couple of weeks ago. I don't often have cod, and if I do, it's usually battered and served with chips. I've been telling myself to eat more fish, but because cod tends to be a bit tasteless on its own, I'd go for salmon instead.

Steaming dishes are a healthy way to cook, and it's also pretty convenient, as the steamer does all the job for you! I bought a steamer a few months ago, as I suddenly got into the healthy eating mode. Unfortunately, I didn't use it as often as I like since then, as fried food often appeals to me! (Tempura anyone?)

This was a quick dish to make; it didn't take more than 20 minutes, and most of the time was used to steam the fish, during which you don't really have to do much anyway!


Asian style steamed cod
(Serves 2 as a main)

Ingredients

280-300 grammes of fresh boneless cod fillets, lightly seasoned with salt and pepper
1 inch of fresh ginger, half sliced into matchsticks, and half sliced at an angle, thinly
2-3 cloves of garlic
2 stalks of spring onion, finely sliced lengthwise
2 tablespoons of light soya sauce
1 1/2 tablespoon of vegetable oil
Handful of coriander, roughly chopped
1 teaspoon of sugar

Method

  • Rinse the fillets and pat them dry. Place them on a heat resistant plate, and place the ginger slices (sliced at an angle) on top of the fish and a small handful of the spring onion.
  • Steam on high heat for about 15 minutes. If your fillets are thick, it may take another 2-3 minutes to cook, check as you go along.
  • In the meantime, heat the oil in a wok. Add the matchstick ginger pieces and garlic, and fry for about 1 minute.
  • Add the light soya sauce and sugar. Continue cooking on low heat until the sugar dissolves.
  • Once the fish is cook, dish it up from the steamer and place it on a serving plate. Pour the hot soya sauce mixture on the fish, and garnish with the remaining spring onion and the coriander.

Friday, 16 March 2012

Prawns with chilli and garlic

I had this for lunch yesterday, a pretty light lunch I reckon! It didn't take long to prepare and cook at all, possibly not more than 20-30 minutes. Quick, easy and yummy, what more do you want? :)

Only thing I would stress is to use raw prawns in this recipes, it provides the all important flavour; the sweetness from raw seafood.


Prawns with chili and garlic
(Serves 1 as a main)

Ingredients
250 grammes of raw prawns
1/2 inch of fresh ginger, sliced into matchsticks
2-3 cloves of garlic
A handful of fresh coriander
1 1/2 tablespoons of plain flour
1 teaspoon of sugar
A pinch of chilli flakes
Zest and juice of half a lemon
Salt to taste
1 tablespoon of olive oil

Method

  • Mix the flour and prawns together in a bowl, lightly seasoned with salt. Add about 1 teaspoon of water to combine.
  • Heat the oil in a wok/frying pan.
  • Add the garlic and ginger and fry until lightly browned.
  • Add the prawns and fry for about 1 minute. Add the chilli flakes.
  • When they're starting to turn pink, and crispy around the edges, add the lemon zest, lemon juice and sugar.
  • Add the coriander, and continuing frying until the prawns are cooked.
  • Serve immediately with some crusty bread, or as I've done, some lightly fried boiled new potatoes.

Tuesday, 13 March 2012

Spaghetti with meatballs, peas and lemon

I never used to eat much pasta when I was growing up, but these days, I even have cravings for it! I love tomato based sauces, cream based sauces, or even those without any sorta sauce! (like aglio olio recipes, with just butter and garlic). As I don't eat beef, I haven't had the true bolognese sauces, although I have used pork and minced chicken in the past.


This recipe was inspired by a recipe found on the BBC Good Food website. I did make some tweaks to adjust it to my taste, and ended up not referring to that recipe at all when cooking it.


Spaghetti with meatballs, peas and lemon

Ingredients
For the meatballs (makes 8-12)
250 grammes of minced turkey
2 slices of fresh baguette
1 medium sized carrot, grated
2 stalks of spring onion, roughly chopped
3-4 sprigs of parsley
1 egg
salt and pepper to taste
2 tablespoons of olive oil
Grated cheddar (about 50 grammes)

For the pasta
250 grammes of spaghetti
100 grammes of frozen peas
3-4 cloves of garlic, roughly chopped
zest and juice of 1 medium sized lemon
1 tablespoon of olive oil
1 1/2 tablespoons of creme fraiche
salt and pepper to taste
finely chopped parsley for garnish

Method

  • First, we make the meatballs: Blitz the baguette along with the parsley and 1 tsp of olive oil. The fresh baguette helps makes the meatballs moist and juicy.
  • Mix the breadcrumbs with the meat in a mixing bowl. Add the grated carrot, spring onions and egg. Stir until well combined, and add the cheddar. Lightly mix, and season with a little salt and plenty of black pepper.
  • Shape the mixture into meatballs about the size of the centre of your palm, say about 2-3 cms in diameter. They don't have to be of a particular size though! Just bear in the mind the time needed to cook them will increase the bigger the balls are :)
  • Pan fry the meatballs in a deep pan (or wok) until golden brown with the remaining oil. Drain and leave aside.
  • Cook the pasta according to the packet's instructions, until al dente. Drain and reserve some of the starchy liquid.
  • While the pasta is cooking we finish up the sauce. Using the oil used to cook the meatballs, add another tablespoon of oil into the wok. The oil used to cook the meatballs has SO much flavour, don't throw it away!
  • When the oil is hot, add the garlic and frozen peas. 
  • When the garlic starts to turn a bit brown, add the lemon juice and lemon zest. Stir well with a spatula and season with salt and pepper.
  • Add the spaghetti to the sauce.  
  • Turn down  the heat to low, and add the creme fraiche. Stir well until well combined. If the sauce is too thick, add the liquid from cooking the spaghetti. 
  • Add the meatballs and gently stir them in, be careful not to over do it, else they'll fall apart. 
  • Garnish with chopped parsley.
  • Enjoy!
The meatballs were so juicy! Don't leave out the carrot, as it helps keep the meatballs juicy and gives a lovely sweetness. So yummy! The creme fraiche in the sauce gave the dish a richness, thus not much was needed. Although the dish was slightly rich, the tang from the lemon juicy livens up the flavours of the dish, and makes it even better! Don't leave that out either! :)

Pan frying the meatballs

Stirring in the creme fraiche, I may have gone overboard on the peas :)
Yummy dinner! I did go back for seconds :)

Sunday, 11 March 2012

Cheat's garlic bread

It's as per the title says! This is a very quick breakfast, good for afternoon snacks, or whenever you're in a hurry.
Cheesy crust. Mmmm..

Cheat's garlic bread

Ingredients

3 slices of baguette
a handful of parsley (roughly chopped)
1 tablespoon of butter
1 teaspoon of garlic powder
some grated cheddar

Method

  • Mix the butter, garlic powder, and parsley until well combined.
  • Spread the slices with the butter mixture.
  • Top with grated cheddar, and grill it for 2-3 minutes, until the cheese melts, the slices become golden brown.


Saturday, 10 March 2012

Seafood fried rice

Fried rice is, to me, one of the easiest and yummiest ways to use leftover rice! I cook rice very often, using a rice cooker. Using a rice cooker to cook rice is the easiest, and most convenient way to do it. You don't have to stand over the stove, making sure the rice doesn't get burnt. It does all the cooking by itself, while you can continue with your prep of other ingredients.

Yummy fried rice
Anyways, back to the fried rice! I cooked quite a lot of rice last week, and I couldn't finish it! So I ended up making fried rice the next day. Using leftover rice is often recommended, as it's not too clumpy and wet. You can use any meat in fried rice; I've used chicken and pork in the past, and I've also made vegetarian versions too. There are so many ways to jazz up the dish, and you can add the ingredients as to your liking.

Hot fried rice in a wok!
Seafood fried rice

(Serves 3-4)

Ingredients

2-3 cups of cooked rice
3-4 cloves of garlic, finely chopped
2 small carrots, sliced at an angle
1/3 of a head of broccoli, cut into small florets
400-500 grammes of seafood (I used prawns and squid)
2 red onions, finely sliced
2-3 tablespoons of oyster sauce
2-3 tablespoons of light soya sauce
2 eggs, beaten and seasoned with peppers and light soya sauce
2-3 tablespoons of ketchup
salt and pepper to taste
2-3 tablespoons of vegetable oil

Method
  • First, make a simple omelette with the beaten eggs. Once done, set aside.
  • Heat some oil in a wok. Add the sliced red onion, and cook till soft.
  • Next add the garlic, and cook for about 1 minute, until lightly brown. 
  • Add the carrots and broccoli. Cook for another 3-4 minutes.
  • Add the seafood, and fry until they're almost cooked.
  • Add the rice and fry for 2-3 minutes, until all the vege and the garlic pieces are well combined in the wok.
  • Add the oyster sauce, light soya sauce, pepper and ketchup. Stir until the sauces are well combined.
  • Cook for another 3-4 minutes, and serve!
Carrots and onions in the wok first!
Broccoli next; you always need your greens!
Almost done now :)

Friday, 9 March 2012

Omelette, fried potatoes and tomato salad

Sometimes I just have cravings for certain types of dishes, or food of certain textures. On one fine morning last weekend, I craved for eggs. In my mind, I was thinking of the Lurpak advert, where a guy comes home from work late at night, and makes himself the most delicious looking omelette ever. It looked buttery, with soft insides. Yum!!

I wanted to replicate that, but I had only had one egg in the fridge! Just one! So I thought it was a bit hard to make a thick omelette, like in the advert. So I tried to jazz it up a little.


To make the omelette, I first beat the egg, and seasoned with pepper. The twist was the addition of ground cayenne pepper. I don't use cayenne pepper much before, but these days, I tend to add it to almost everything! The cayenne pepper gives a lovely sweetness to the egg, and I didn't find it spicy at all. Once the egg was almost cooked, I added a generous portion of shredded cheddar, that's why I didn't add salt earlier.

The potatoes was easy as well! I cubed one large potato, par boiled it, and fried it in 2 tablespoons of olive oil until slightly brown. Again I added the cayenne, and seasoned with salt and pepper.

The tomatoes was even easier! Just roughly diced, and seasoned with olive oil, balsamic vinegar, salt and a touch of sugar, served which some baby rocket leaves.

I also had one frankfurter. Breakfast was so good! Definitely gave me the morning boost that I needed :)


Sunday, 4 March 2012

Chicken enchiladas

On my shopping trip to Tesco last weekend, I purchased a packet of tortillas. I was thinking of bringing some wraps to work for lunch, I haven't done that for a while, and am getting a bit bored with the lacklustre choices at the workplace canteen. 

Baked enchiladas! I made 3 as as to have leftovers :)

Colourful!

I wanted a relatively quick and easy lunch during the weekend, to use up the tortillas. I usually don't manage to finish the whole packet, so I thought might as well use some during the weekend. Fajitas came to my mind, but I didn't have avocado to make guacamole with, or sour cream for that yummylicious zing. So instead, I make this version of chicken enchiladas instead.

The enchiladas before going into the oven
I'm not very well-versed with Mexican food. I can only think of fajitas, enchiladas, burritos and quesidillas. But based on what I have tried so far, Mexican food is full of flavours, with lots of spice and heat. I have fallen in love with Mexican food, and I think I should really try to cook them more often! It's so easy to make, and often packs a punch with every mouthful. What's your favourite Mexican food? 

Chicken Enchiladas.

Ingredients
(Serves 1-2)

2 tortillas (I used Mission Deli's Mediterranean tortillas)
300gs of chicken breast, sliced in relatively large strips
2 bell peppers, cut into strips
1 red onion, roughly sliced
2 tins of plum tomatoes (I used whole plum tomatoes, rather than chopped ones)
1-2 teaspoons of sage
1-2 teaspoons of sugar
1 red chilli, roughly chopped. I kept the seeds in as I wanted the heat.
2 tablespoons of olive oil
Grated cheddar
salt and peppers to taste

Method
  • Heat the oil in a deep saucepan/pot and add the red onion and bell pepper strips. Saute for 2-3 minutes.
  • Add the chicken strips, and fry them until they are cooked and have a slight golden tinge at the edges.
  • Drain the tomatoes, and reserve the liquid. Roughly chop the tomatoes (I used kitchen scissors) and pour them into the pot.
  • Fry for another 2-3 minutes until well combined. Add the salt, sugar and pepper to taste. Sugar cuts through the acidity that tinned tomatoes sometimes have.
  • Add the reserved liquid from the tomatoes, and add the sage. Taste as you go along.
  • Add the chilli and cook for another 2-3 minutes, until the sauce is bubbling
  • Now, to assemble the enchiladas: Using a slotted spoon, spoon the chicken and the peppers onto the middle of a tortilla. Fold the left and right sides to the middle, then fold the bottom side to the top, to get a pocket. Carefully fold the top end to the bottom, to get a parcel. 
  • Note: It is important not to overfill the tortilla. I'm always for 'more is better', but not this time I'm afraid!
  • Next continue with the remaining tortilla.
  • Lay the tortilla parcels on a shallow baking tray line with foiled or baking paper. Ladle some sauce on top of the parcels, and sprinkle generously with the grated cheddar. (and I do mean generous! You want that salty gooey stuff! :D )
  • I used a trick I saw on Food Network: I froze the cheese for a couple of hours, before grating. It really was easier to grate, and the cheese did not clump together.
  • Put in a hot oven at 180 degrees celcius for about 10 minutes, or about 4-5 minutes under a hot grill until the cheese bubbles and the parcels turn a lovely golden brown.
  • Garnish with some sprigs of coriander(also known as cilantro). I served mine with some sliced iceberg lettuce.
  • Enjoy!
Garnished enchiladas; the coriander goes so well with the tomato-ey and cheesy sauce!.

Thursday, 1 March 2012

Misato

Misato is a no fuss little cafe located in Chinatown, London. There's always a queue, but believe me, it's worth it. Food comes in large portions (which is always a plus for me), and always piping hot. I can't really comment on the authenticity, but the flavours were good, and I never leave the cafe feeling dissatisfied.


Chicken karaage with rice, salad and a dollop of mayo

I ordered the chicken karaage, deep fried juicy pieces of chicken, that came with some steamed rice and salad. The salad was very simple; it consisted of sliced lettuce, some tangy dressing, and a single cherry tomato. But it fulfilled the role of a compulsory vege side dish. I was extremely hungry (I had this meal at about 2.30pm) and this hit the spot.

Z ordered a serve of tempura, which consists of vegetable (aubergine, sweet potato and mushroom) and prawn tempura. The batter was crunchy, and oh so good!! The tempura came with some sweetish, salty dipping sauce.


Z also ordered a bento, that came with a generous serving of salmon cooked in some teriyaki-wine sauce. The sauce was so delicious! I plan to order that the next time I go to Misato.

It's not fancy at all, far from it, but service is quick and efficient. If you're keen on fuss free, good, affordable Japanese food, Misato is definitely the place to go to.


Monday, 27 February 2012

Noodle soup with fish balls

Noodle soups are so comforting, especially on a cold winter's night. Though it's not actually that cold outside today, I felt like having a familiar meal, something that would remind me of home. Slurping the lovely light yellow strands of noodles; I felt nice and warm inside. This was also a very quick and healthy dinner!

Colourful bowl of noodle soup! The tofu piece was from a previous meal :)
                           
The fish balls were purchased from Chinatown, and were frozen. I did not defrost them; I just put them straight into the boiling soup. You could substitute the fish balls for fish cake, or cooked shredded chicken. Both would work equally well.

Closer shot of the dish before garnishing with the chilli slices

Noodle soup with fish balls
(Serves 2)


3 pieces of dried egg noodles
2 eggs, beaten and seasoned with some pepper and light soya sauce
300 grams of fish balls (or however many you would prefer)
Some bean sprouts
1 cube of chicken stock
1 red onion, thinly sliced
2-3 cloves of garlic, roughly chopped
2 medium sized chillies, sliced
Some lemon juice
2 tablespoons of light soya sauce
1 tablespoon of dark soya sauce
About 3 tablespoons of vegetable/sunflower oil
About 1-1.5 liters of boiling water
1 packet of beansprouts (about 200 grammes)
Salt and pepper to taste

Method

  • Fry the sliced red onions in 1 tablespoon of oil till soft in a hot wok/pot. Once cooked, set aside.
  • In the same wok, add the remaining oil and the garlic pieces. Once it turns slightly brown, add in the beaten eggs. Let the eggs cook for about 1 minute, and break it up into relatively large pieces before it gets cooked entirely.
  • Add the boiling water, once the eggs are cooked, the chicken stock cube and the dark soya sauce. Season with salt and pepper.
  • Add the fish balls, and bring the soup to a boil.
  • In a separate pot, cook the noodles according to the instructions on the packet. It shouldn't take too long to cook, it should be done within 5 minutes. Drain, and set aside.
  • Once the fish balls are almost done (this should take about 3-5 minutes), add the beansprouts. We don't want the bean sprouts to be over cooked, so 1-2 minutes of cooking them should be more than enough.
  • To serve, divide the noodles into two portions in two bowls. Ladle the soup into the bowls, and garnish with the fried onions. I usually serve dishes like this with sliced chillies, in some soya sauce and lemon juice. 

Noodle soup with chillies

Saturday, 25 February 2012

Roasted peppers and apetina cheese salad

I had one sweet pointed red pepper that needed to be used up I wanted to eat a relatively light meal, with no meat, as I felt like I've been having too much meat recently. This is a warm salad, and very easy to make. Hope you'll enjoy it as much as I did!


Roasted sweet pepper and apetina cheese salad
(Serves 2 as a side dish, or 1 as a main meal)

1 sweet pointed pepper (This was the one I purchased. If you're using regular peppers, you will need 2 or 3 for this dish)
2 red onions, finely sliced
1-2 cloves of garlic, chopped
50-80 gs of spinach (I used frozen spinach, defrosted)
About 100g of apetina cheese (Goat's cheese, or any firm cheese will do.)
1-2 tablespoons of balsamic vinegar
1 1/2 teaspoon of brown sugar
Some rocket to garnish
Salt and pepper to season

Method
  • Pre heat the oven to 180 degrees.
  • Fry the garlic till almost brown, and add the red onions. Pan fry the onions on medium heat until soft, this will take about 10 minutes. Add the balsamic vinegar and sugar, and fry for another 3-4 minutes until caramelised. Cook on medium heat, as we don't want the onions to burn.When done, leave aside.
  • Assemble the ingredients: First, add the onions at the bottom of the roasting pan. I used a shallow roasting pan, and put some foil to ease cleaning later.
  • Then, add the spinach, followed by the apetina cheese, cut in small cubes. 
  • Finally, add the red peppers.
  • Cook in the oven for 15 minutes, then grill for another 5 minutes. The cheese should be slightly gooey, but still maintain its shape.
  • Serve with a drizzle of olive oil, and season with salt and pepper. Apetina was quite salty, so be careful with the salt. Garnish with the rocket.

Because I loved it so much, here's another picture of the salad!


Thursday, 23 February 2012

Hotel Chocolat: Pistachio Praline

I failed. I have done so well really. Each time I go to a Hotel Chocolate store, I have managed to resist the temptation. Each time I would go in, stand in front of the shelf, contemplate, and then leave. But nope, not this time. This time, I went it, took it and went straight to the counter to pay. I think I was in the store for less than 5 minutes.


I love pistachio, all things pistachio. And this is one of my favourite chocolates! I love the creamy pistachio paste in it; it was so nutty and scrumptious! The filling was quite generous as well. I enjoyed every little bite (not many!) of this tiny treat :)


Disclaimer: This entry was not a sponsored post, and is entirely based on my personal tastebuds.  I have not received any monetary or non-monetary payment to write this post.

Monday, 20 February 2012

Ricotta stuffed mushrooms, sweet peppers and roast chicken

I had some ricotta in the fridge that I needed to use up. Hence on my trip to Tesco, I purchased some large flat mushrooms and some sweet pointed red peppers. I've never cooked stuffed mushrooms before or even had the dish! It was a success! I should have tried this way earlier, I have definitely missed out.


Ricotta Stuffed Mushrooms
(Serves 2 as a side dish, or 1 as a main meal)


150g of ricotta
1 green chilli (Adjust according to how spicy you would like it to be)
Some grated cheddar
1 teaspoon of lemon zest
Juice of half a lemon
1 teaspoon of dried sage
Salt and pepper to season

  • Clean the mushrooms; I rinsed mine lightly, and wiped them dry.
  • Mix the ricotta and the rest of the ingredients (except cheddar) until well combined. Season well, as ricotta can be quite bland.
  • Stuff the mushrooms with the mixture, and add some grated cheddar at the top.
  • Cook in a fan assisted oven ( 180 degrees) for about 10-15 minutes. Then put them under the grill until they're crispy and golden brown.
I also stuffed a sweet pointed pepper with the mixture. In this case, I added some spinach as well (just some frozen spinach, defrosted using a microwave oven). The pepper needed a bit longer to cook. The sweetness of the roasted pepper complemented the ricotta very well.

Checking out the insides of the stuffed mushroom


I reckon, adding some roasted garlic, or sauteed red onion to the dish will add even more flavour. There are so many ways to jazz up this dish, the options are endless! 

I has the mushroom with some roasted chicken, marinated in jerk sauce. I added some red onions at the bottom of the roasting pan, and squeezed some lemon juice. Yums! If you have the chance to marinate it overnight, the flavours will be more intense; absolutely yummy :) 

Glistening! I couldn't wait to tuck in when I was taking this photograph!